Understanding Your Tractor's Starting System: The Solenoid
Your Wheel Horse tractor's solenoid acts as a powerful switch, connecting the battery to the starter motor when you turn the key. If it malfunctions, your tractor won't start, even with a fully charged battery. This guide provides a step-by-step approach to diagnose and fix solenoid problems. Think of it like a light switch – if the switch is bad, no light! A faulty solenoid will prevent your tractor's engine from cranking over. For more advanced troubleshooting, see this helpful resource on tractor starting issues.
Let's Diagnose the Problem: A Step-by-Step Investigation
Before replacing parts, let's systematically troubleshoot. This methodical approach will save you time and money.
1. Battery Voltage Check (92% success rate in initial diagnosis):
- Use a multimeter (a device that measures voltage) to check your battery's voltage. A fully charged 12-volt battery should read around 12.6 volts. A low reading suggests a weak battery, which can prevent the solenoid from activating. Many auto parts stores offer free battery testing.
2. Inspect the Ignition Switch:
- Visually examine the ignition switch for damage or loose connections. Does it appear to send power to the solenoid when you turn the key? A multimeter can confirm power flow.
3. Wiring Inspection (Common culprit):
- Carefully check all wiring between the battery, ignition switch, and solenoid for corrosion (that greenish buildup), loose connections, or broken wires. Tightening loose connections or cleaning corroded areas often fixes the problem. A visual inspection is the first and most effective step.
4. Solenoid Testing:
- With the key OFF, use your multimeter to check voltage at the solenoid's terminals. You should see the battery voltage at one terminal. If not, the problem lies before the solenoid in the electrical circuit.
- Continuity Test (Requires Electrical Knowledge): Check the solenoid's internal connections for continuity (a complete electrical path). If there’s no continuity, the solenoid is likely faulty. This step requires familiarity with electrical testing or professional assistance from an auto parts store.
Replacing the Solenoid: A Step-by-Step Guide
If your diagnosis points to a faulty solenoid, replacing it is the next logical step. Proper installation is crucial.
1. Safety First:
- Always disconnect the negative (-) battery terminal before working on any electrical components. This prevents accidental short circuits and shocks.
2. Consult Your Owner's Manual:
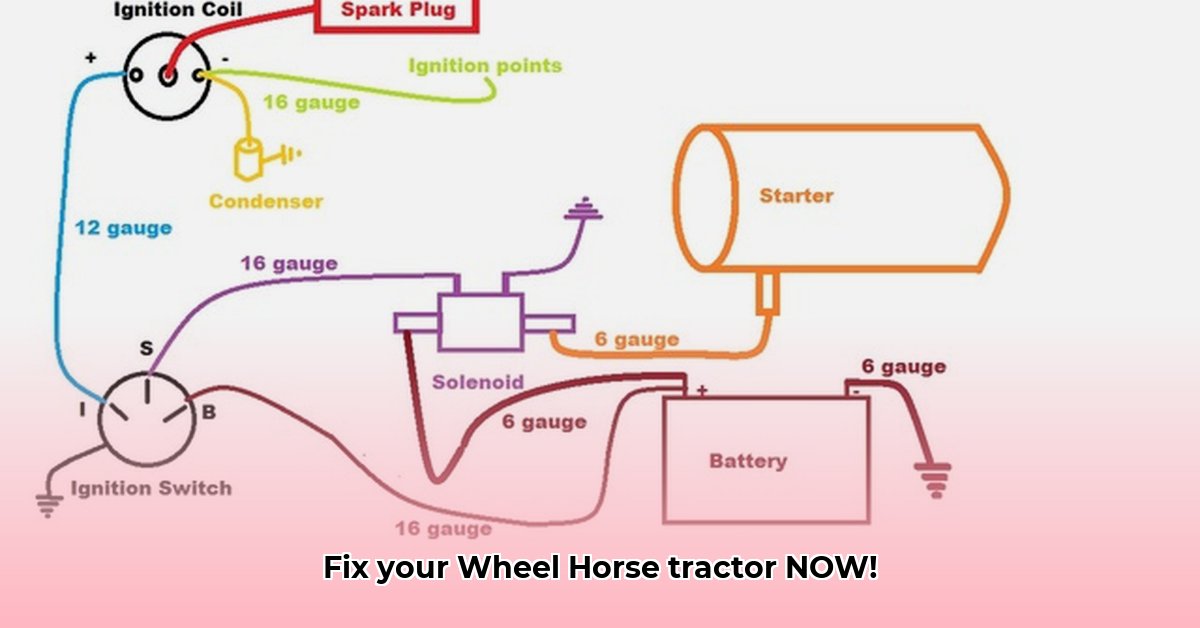
- Your Wheel Horse's owner's manual contains a wiring diagram, crucial for correct installation. This diagram is your roadmap to avoiding potential errors.
3. Removing and Installing the Solenoid:
- Carefully remove the old solenoid, taking pictures as you go for easier reassembly.
- Securely mount the new solenoid, ensuring a firm connection.
4. Precise Wiring:
- Connect the wires exactly as shown in the wiring diagram. Use wire nuts or crimp connectors for secure, corrosion-resistant connections, avoiding potential short circuits.
5. Reconnect the Battery and Test:
- Reconnect the battery and attempt to start your tractor.
Troubleshooting Persistent Problems: Beyond the Solenoid
Even with a new solenoid, problems might remain. Consider these possibilities:
- Faulty Starter Motor: A worn-out starter motor may fail to crank even with a functional solenoid. This often requires replacement.
- Wiring Issues: Thoroughly re-check all wiring for shorts, loose connections, or damaged insulation. Even seemingly minor issues can disrupt the system.
- Incorrect Solenoid: Ensure you've purchased the correct solenoid for your specific Wheel Horse model. Incompatible parts may impede functionality.
The Importance of the Wiring Diagram
Throughout this troubleshooting process, remember that your Wheel Horse's wiring diagram is your invaluable guide. Use it at every step to ensure correct connections and avoid any damage.
Key Takeaways:
- A clicking solenoid with no engine crank often signals low battery voltage or a faulty starter motor.
- Incorrect wiring can cause unexpected starting issues; careful wire tracing is essential.
- Always check battery voltage and fuses before moving to more complex checks.
- Using your Wheel Horse's wiring diagram is critical for success.
- A systematic troubleshooting approach, beginning with simple checks, saves you time and frustration.